Tuesday, April 23, 2013

Waiting in the wings

After I finished a tablecloth for my cutting table in my sewing room, I had plenty of fabrics left for a smaller one. Very convenient actually, because by that time I had purchased both my hand crank machines, and I was looking for a simple project to use one.

I've always had a soft spot for log cabin quilts. They are fun to sew, and I love how you can play with a variety of layouts. So, when I read about log cabin rulers by Marti Michell, I bought them in two sizes.
The photo shows the ruler for the widest strip size available: the 2"/1" ruler. It's the perfect ruler for jelly rolls, because all you need to do is cut the strips to the appropriate lengths.
log cabin ruler
Log Cabin Ruler


detail log cabin ruler

As you can see in the closeup picture, the strips you cut are the exact length of each individual strip. Which means that you don't need to cut excess fabric once you've added a new strip. I find that very helpful in keeping the blocks square.

What the picture only shows a glimpse of, is that you can combine 1" and 2" strips to make off-center log cabin blocks.

A picture of the small tablecloth:
tablecloth log cabin


Since this was done with the jelly roll leftover, the blocks are quite big.
For my next log cabin quilt, I'm going to use the other ruler, because I want smaller blocks. So I'm going for  3/4" strips (finished size).  I hope I have enough fabric for a bed quilt.

The fabrics for the new log cabin quilt:


The red and yellow are accurate, but for some reason the soft green looks like turquoise. I have a very specific block setting in mind, and 1 shade of red and yellow will do.

Lastly, just a fun picture of the new fabrics together with the Singer 127.
log cabin fabrics too

Friday, April 19, 2013

Border woes

overall view of wallhanging


Adding the three borders to my wall hanging didn't go well.
The seams of the first border puckered.  I should've taken the time to find out why, but I continued to sew them on instead. I was hoping to literally iron them out, I guess. ;-))

Anyway, prior to this project all I had done with the Singer 127K was a couple of test runs after I had oiled it. In other words, this was its first real project.

I had to tinker a bit with the stitch length when I started the paper foundation piecing, but the tension was fine. And remained fine most of the time.
But this is what I couldn't figure out: occasionally the tension setting changed apparently, particularly when I hadn't used the machine for a couple of hours. And then I would have to find the correct setting again first and continue to sew.

Now, I'm a beginner when it comes to hand crank machines. I'm not sure how they're supposed to behave. My first sewing machine was an electric Singer 191B. I still have it, by the way.
As I recall I hardly ever had to adjust the tension on it. It would sew anything.

Anyway, after trying every setting of the upper tension I resorted to adjusting the screw on the shuttle by turning it 1/8" anticlockwise. As a result of that the seams of the last border strips were fine.

Of course I still need to unpick all the borders, and start over. Hopefully the tension won't give me any more problems this time around. However, if the tension problems keep reoccurring I obviously haven't solved the problem. I feel I need a professional to have a look at it.
But first I'm going to start over with the borders, and see how it'll play out.

Time to show and tell, so here's some more pictures I took. Come to think of it,  maybe it wasn't just the tension issues. After I added the first border I removed the paper foundation. Some parts of the houses stretched a bit. I chalked it down to how the pieces were cut. I hadn't paid any attention to the grain. After all, the paper foundation acts as a stabiliser. Maybe I should've left it in.


detail puckerd borders
detail puckered borders


Wednesday, April 10, 2013

Row of houses complete

Yesterday I completed the row of houses.
As I mentioned in an earlier post, I had to order new fabric for one of the houses. The fabric I had planned to use didn't match the overall color scheme.


houses ready
Houses are ready!


I had taken my chances and ordered the fabric online. Well, I was lucky, because I love it. I think it coordinates very well with the other fabrics. It's the fabric in the fourth house from the left.
The design of this house is different, hence the fabric should be different too.

Next I'll need to cut borders and the binding.
A total of three borders in two different widths (alternating wide and narrow), followed by the binding.
The thing is I don't like cutting borders, so I'm procrastinating. I don't mind sewing them, but cutting them is bleh. The binding on the other hand is something I look forward to. I like to sew on the binding by machine first, and after that hand sew the back. 
I find hand sewing very soothing, especially on a sofa with two napping cats next to me.

It's so enjoyable to do this on the Singer 127K.  It holds the stitch length perfectly, and the tension too. Of course you need to adjust the presser bar a bit when you add a new house due the amount of seams involved.

I do have to pay intention to where I start stitching. If the needle is lowered it must hit the fabric. You can't start stitching while there's no fabric under the presser foot. Good heavens, how do you say this in English?
Well, I hope it makes sense. Anyway, if you're not paying attention to that, you'll get snags. That's what I was trying to say, ;-)).


Thursday, April 4, 2013

Meet my Singer 15

Singer 15 FrontView
Singer 15


Here she is: my Singer 15. She was made in Italy in 1934.
She could be a 15-88, but I'm not sure.

I found her at a Dutch auction site. There were no extra feet, bobbins or attachments, but at least she had no missing parts. That was a relief, I must say, because she appeared to be in poor condition in the pictures the previous owner had taken.
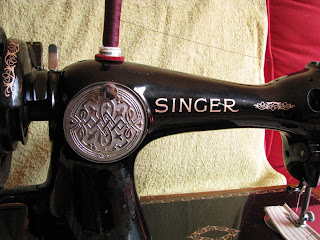
But I wanted her anyway, because she has such a pretty faceplate.

Singer 15 faceplate
Faceplate


singer 15 cover plate
Cover plate


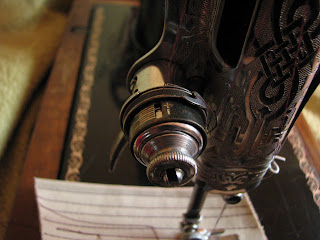
She also has an intriguing tension unit, at least to me. When I bought this machine, it was the first time I saw one like that.
singer 15 tension unit
Tension unit


While testing the tension setting on a piece of fabric, the adjustment knob (not sure what it's called in English) accidently came off and the tension unit came apart.
I was in shock! Well, it wasn't hard to reassemble it, but I had no clue how to calibrate it. So I asked my regular repairman whether he was willing to work on a vintage sewing machine. He said yes, and off she went to the shop.

He took great care of her, I must say. Apart from a minor repair, he repositioned the take-up spring and calibrated the tension unit. And he serviced the entire machine. Maybe he thought I had missed an oiling spot, ;-). 
Well, at least she got the full spa treatment, and her movement is ever so smoothly.

Maybe I'll have him check my Singer 127K as well. Just to make sure I haven't overlooked something.


Monday, April 1, 2013

More about the wall hanging

There's going to be five houses in the Canal row houses wall hanging.
I'm working on the fourth house, but one of the colors I had planned to use clashes with the overall color scheme.

I hope the fabric I've ordered online is the right one. I wish I could've gone to the store and see the fabrics in person. Alas, my favorite store is too far away. I can't justify a trip to Amsterdam, just to get 1 fat quarter of fabric.
So, I made do and took my chances ordering it online. I expect to receive it tomorrow.

Meanwhile I joined the three finished houses. And took some pictures.

Canal houses joined
Canal row houses are joined now


The technique is called paper foundation piecing. My printer has run out of ink, so I copy the pattern by hand. I use regular print paper, a ruler and a pen.
Since this design is pretty straightforward, it's quite easy to copy it that way. Of course with a more complex design it might not be so easy to maintain accuracy. In that case you'd be better off photocopying it.
Seen from the back
The Back


So this is what the back looks like. For now I leave the paper foundation in place, but I tested how to tear it away in two seams of the house in the middle. The needle perforates the paper when you stitch, which makes it quite easy to tear away the paper when you're done.
A closeup:

Detail paper foundation
Closeup paper foundation


Technically I could leave the paper in. This is a wall hanging after all. I guess, it depends on whether I''ll want to embellish it.

Lastly, some closeups of the houses. My apologies for the cat hairs. I was so caught up in taking pictures, that I completely forgot to check for cat hairs first. I'll do better in future, I promise.
closeup left house
Closeup house on the left


middle house
Closeup house in the middle